
With a handful of simple ingredients and some dedicated time in the refrigerator, you can easy homemade focaccia bread right at home! Chewy, soft, flavorful, and 100% irresistible!
This might be the easiest recipe in my entire arsenal, and it might be my most well-received recipe. And by “well-received,” I mean friends and family inhaling this bread and then immediately asking for the recipe. Y’all, I cannot say enough about this easy homemade focaccia bread. It is, hands down, one of the most drool-worthy things to come out of my oven. And the ironic part is that it requires only a handful of ingredients, very little skill, and even less effort.
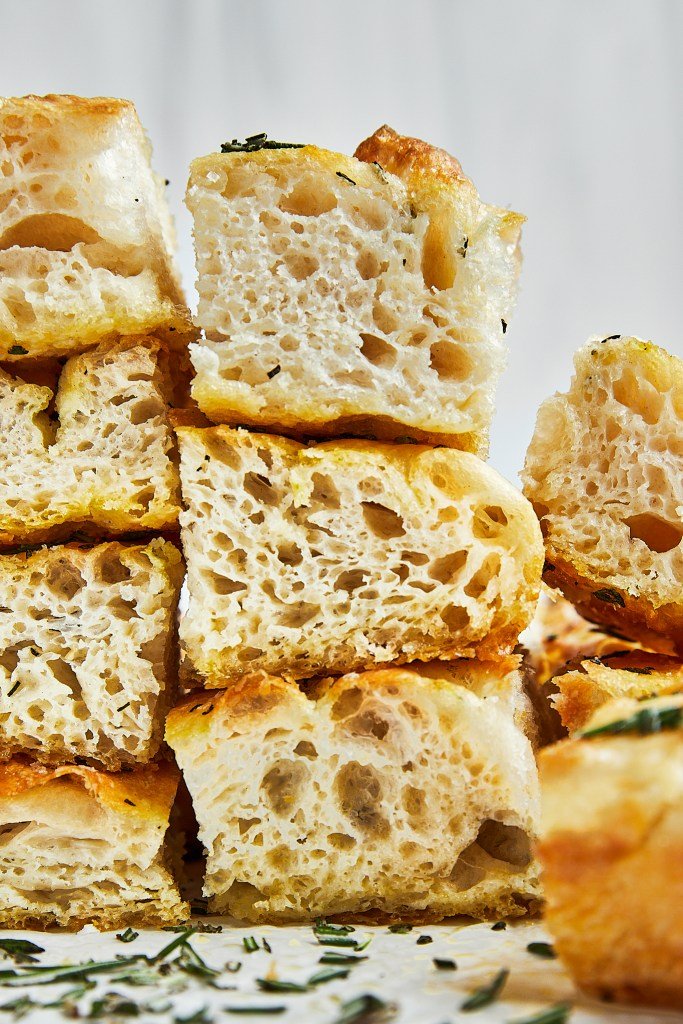
This focaccia bread has a lovely golden, crisp exterior thanks to a generous coating of olive oil. But the inside? The inside is chewy, soft, and full of those lovely air pockets that make focaccia so fabulous. Topped with some flakey salt and chopped rosemary, and (*chef’s kiss*) you have yourself some seriously delicious carbs. I personally like to slice this warm from the oven.
Never made bread before? Great! This recipe is for you. That’s not to say this recipe isn’t for the experienced baker either. This focaccia bread recipe is for you if you’re at all into chewy, pillowy-soft, salt and olive oil-infused, drool-worthy bread. Which is most of humanity, right?
All you need is a few simple ingredients and some time. The dough needs to rise in the fridge for at least 18 hours, up to 72 hours, then rise again at room temperature for another 3 to 4 hours before baking. I know that seems like a long time, but I promise it’s worth it- the long rise in the fridge is exactly what makes this focaccia bread so darn delicious. So plan ahead! And keep in mind the hands-on time is minimal!
So let’s make focaccia bread! I’ve got all the details and step-by-step instructions below.

What you’ll need to make homemade focaccia bread:
Bread flour: Bread flour, in comparison with all-purpose flour, has a higher protein content, which in turn means your bread will contain more gluten. More gluten means the dough will be stronger, stretchier, and able to withstand big pockets of air (created by the yeast) without collapsing. This extra gluten also makes the focaccia extra chewy!
Instant yeast: Yeast is the key player in fermentation (which provides flavor and rise). Once activated by the warm water and starches in the flour, the yeast starts to produce carbon dioxide (a gas), which creates those beautiful air pockets we love in focaccia bread.
Kosher salt: For flavor and balance.
Water: Focaccia is a “high hydration” bread, which means there’s a high proportion of water to flour in the recipe. Water plays a role in fermentation and produces a soft, chewy bread. In order to properly activate the yeast, you want the water to be lukewarm when adding it to the dough (see my recipe notes for an easy trick on getting perfectly lukewarm water!).
Extra-virgin olive oil: Provides flavor, color, and a beautiful crunchy exterior! Be sure to use a flavorful, high-quality olive oil for best results.
Flakey salt: For extra salty flavor.
Rosemary: I love topping my focaccia bread with chopped rosemary, but you can leave this off if you prefer!

How to make easy homemade focaccia bread:
Making this focaccia bread is super easy! No kneading, no special techniques, and simple ingredients. Even if you’re a novice baker, you can make this focaccia bread easy-peasy. Keep in mind, while there’s very little hands-on time, the dough needs to first rise in the fridge for at least 18 hours, then will rise again at room temperature for another 3 to 4 hours. So plan ahead! I promise, it’s worth it!
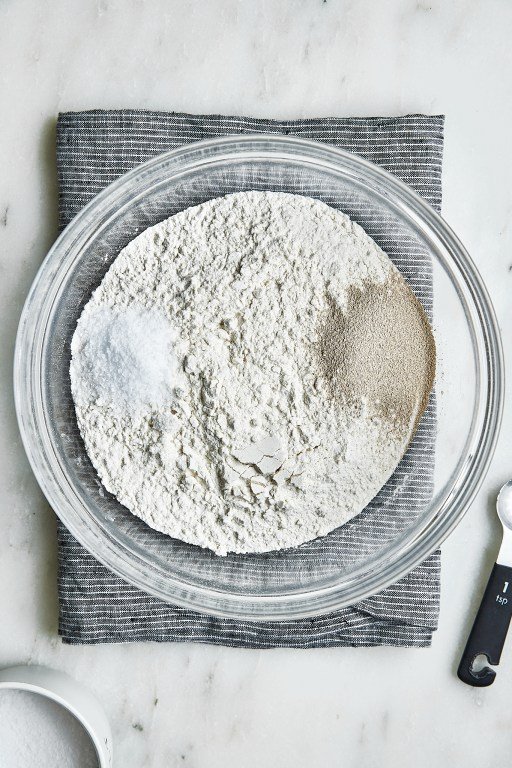
First, add the bread flour, yeast, and kosher salt to a large bowl, making sure to keep the yeast and salt separate for now.
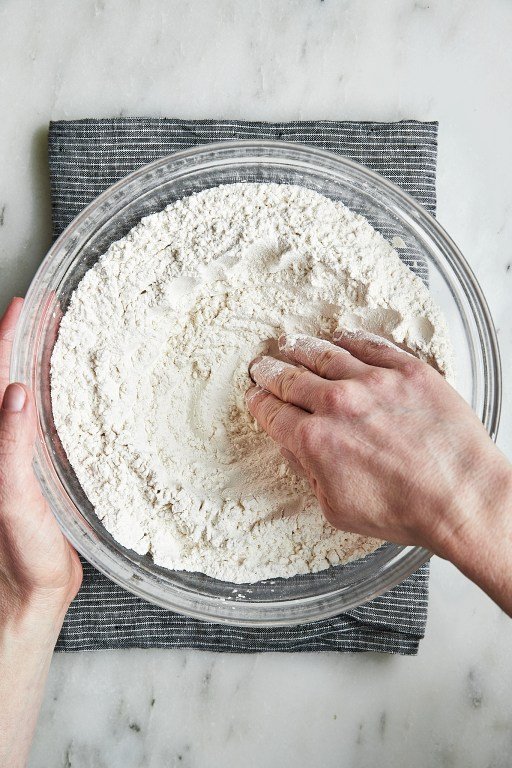
Next, use your fingers to stir it all together! You can use a a whisk or wooden spoon here if you like, but I like getting my hands a little flour-y from time to time, and it gets the job done. Once you’ve got it all mixed together, make a well in the center of the flour.

Pour the lukewarm water into the well you made in the flour, then use a wooden spoon to stir it all together until a wet, shaggy dough forms. Now, you could use your hands to bring the dough together, but this dough is pretty wet and sticky. So I opt for the spoon here.

Once the dough has come together, drizzle 30 gm (2 tablespoons) of olive oil over the surface of the dough.

Use your fingers to rub the oil all over the surface of the dough. Then pull the dough away from the edges of the bowl, “wiggling” the dough as you work, so that the oil gets to all the sides and the bottom of the dough. You want to make sure that every surface of the dough is coated in oil.
Cover the dough tightly with plastic wrap, then pop it in the fridge for at least 18 hours, up to 72 hours. This is where the magic happens! The long, slow rise is what makes this focaccia bread extra flavorful and chewy.
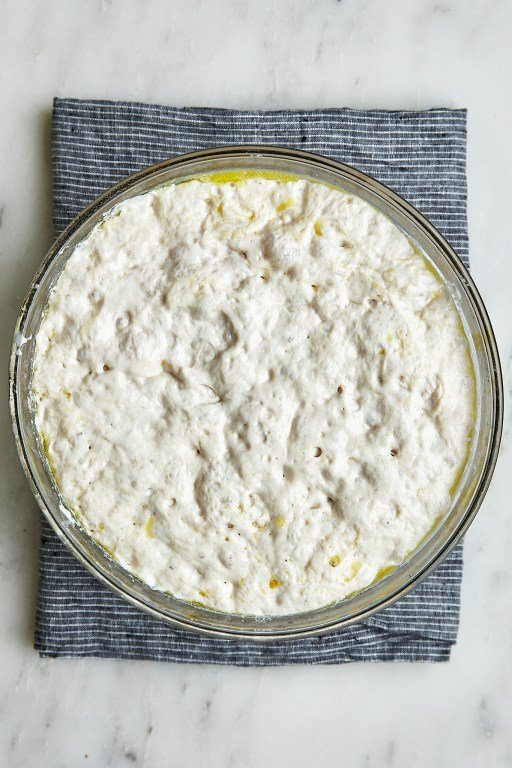
A mere 18 to 72 hours later, and VOILA! Look at that beautiful, jiggly dough.

Now we’re going to work the dough a little and get our hands dirty again. Use your finger tips to pull the dough away from the edges of the bowl and push it into the center. Do this repeatedly, working your way around the bowl, until the dough is formed into a rough ball shape.
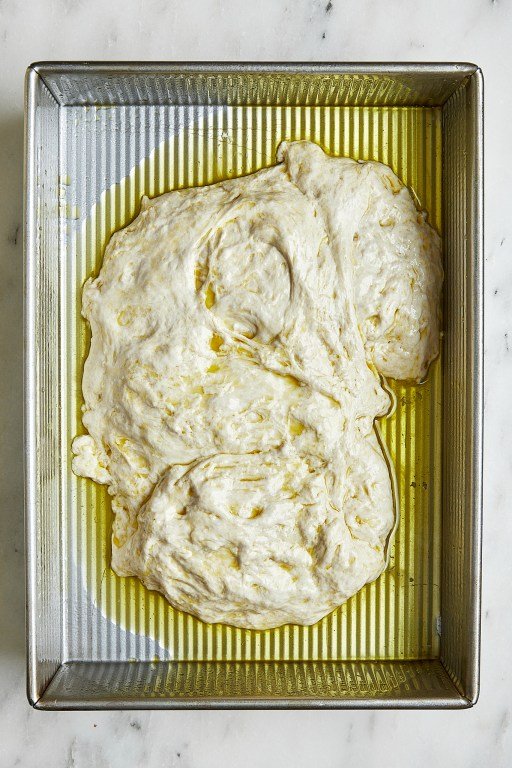
Next, grab a 9×13″ baking pan (I love this nonstick pan from USA Pan). Spray the pan with nonstick spray, then pour 30 gm (2 tablespoons) olive oil in the center of the pan. Transfer the dough to the pan, then turn the dough a few times so that the entire surface of the dough is coated in oil.
Leave the pan, uncovered, in a warm, draft-free place for 3 to 4 hours to rise again. After the second rise, the dough should be doubled in size and should almost completely fill the pan (it’s okay if it doesn’t fill the pan entirely).
Towards the end of the second rise, preheat the oven to 425°F. Be sure to give your oven plenty of time to heat up. You want the oven to be HOT. That’s what makes the exterior golden and crisp!

Once the dough has finished the second rise and your oven is hot, pour another 30 gm (2 tablespoons) olive oil over the surface of the dough and use your fingers to rub it all over. Sprinkle with chopped rosemary (if you’re using it).
Now for the fun part! Use your fingertips to make deep dimples all over the dough. Do this by pressing your fingertips straight down into the dough, reaching nearly to the bottom of the pan. If the dough isn’t quite reaching the corners of the pan, gently pull the dough while you create the dimples to encourage it to fill the pan. If bubbles pop up, just leave them alone- don’t pop them.
Sprinkle with some flakey salt, then pop it in the hot oven for 25 to 30 minutes! Get ready for your kitchen to smell DIVINE.
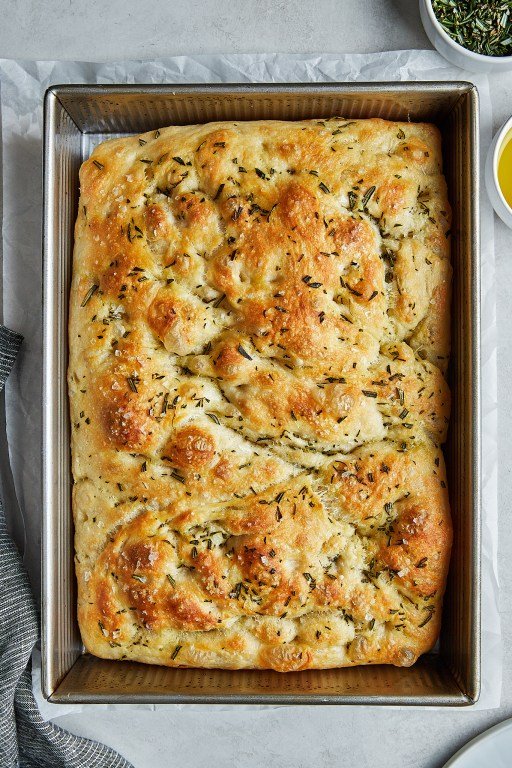
You’ll know the focaccia bread is ready when it’s golden brown, pulling away from the sides of the pan, and your kitchen smells like heaven (seriously).
Let the bread cool for only 5 minutes before carefully removing it to a wire rack (I like to use a big metal spatula for this). This prevents the bread from getting soggy on the bottom. Let it cool on the wire rack for about 10 minutes, then slice and serve! There is *literally* nothing better than warm, homemade focaccia bread straight from the oven. Nothing.
FAQs:
Why is this recipe primarily listed in grams? I develop my recipes in grams because weighing your ingredients is the best, most accurate way to bake. Baking is a science and precision is key to success! Measuring cups are not standardized, and what’s more, the way each baker uses them varies drastically, which ultimately gives you inconsistent (and sometimes negative) results. For instance, did you know that scooping flour out of a cannister can give you 50% more flour than what’s called for in the recipe? By weighing your ingredients rather than using measuring cups, you can confidently know that you are using the correct amount of each ingredient, giving you greater success & delicious results. I highly recommend using a kitchen scale, like this one when you bake. Plus, it makes clean up a lot easier!
What’s the best pan to use for focaccia bread? I love using this 9×13” nonstick pan from USA Pan. I don’t recommend using glass, as many glass dishes cannot withstand high oven temperatures. If you don’t have a 9×13” dish, you can also divide the dough evenly between two 9” cake pans. Keep in mind that you’ll need to divide the olive oil for greasing the pans and coating the dough, too.
Why does the dough require such a long rise in the fridge? This dough requires at least 18 hours for the first rise, up to 72 hours, so plan ahead! I promise, it’s worth it. Chilling the dough during the first rise causes the dough to rise slowly, which in turn gives you a much more flavorful, golden, and chewy focaccia.

Easy Homemade Focaccia Bread
- Prep Time: 15 minutes hands-on time, 21 hours minimum rise time
- Cook Time: 25 minutes
- Total Time: 18 hours, 40 minutes
- Yield: 1, 9×13″ loaf 1x
- Category: Bread
- Method: Baking
- Cuisine: Breakfast, Brunch, Snack
Description
With a handful of simple ingredients and some dedicated time in the refrigerator, you can easy homemade focaccia bread right at home! Chewy, soft, flavorful, and 100% irresistible!
Ingredients
- 500 gm (4 cups, spoon and leveled) bread flour
- 7 gm (2 1/4 teaspoons or 1 standard packet) instant yeast
- 2 teaspoons kosher salt
- 480 gm (2 cups) lukewarm water*
- 6 tablespoons high-quality extra-virgin olive oil, divided
- Flakey salt, for topping
- 1 tablespoon chopped rosemary, optional
Instructions
- Add the bread flour to a large bowl. Add the yeast and kosher salt to opposite sides of the bowl, keeping the two ingredients separate at first. Use your fingers to work the dry ingredients together until combined, then create a well in the center of the bowl. Pour the lukewarm water into the flour mixture. Use a wooden spoon to stir the ingredients together, until a wet, shaggy dough forms.
- Drizzle 30 gm (2 tablespoons) olive oil over the surface of the dough. Use your fingers to rub the oil over the surface of the dough, then wiggle the dough from the edges of the bowl, allowing oil to coat the sides and bottom of the dough. Cover the bowl tightly with plastic wrap and place in the fridge for at least 18 hours, up to 72 hours.
- When your dough is ready to come out of the fridge, spray a 9×13″ baking pan with non-stick spray and drizzle 30 gm (2 tablespoons) olive oil in the center of the pan; set aside.
- Remove the dough from the fridge, and working around the edges of the bowl, use your fingers to pull the edges of the dough towards the center and push down, rotating the bowl as you work. Continue this motion until the dough forms into a ball.
- Transfer the dough to the prepared baking pan. Turn the dough a few times so that the entire surface is coated in the olive oil. Leave to rise in a warm, draft-free place, uncovered, for 3 to 4 hours, until the dough is nearly filling the pan. Towards the end of the second rise, preheat the oven to 425°F.
- Drizzle the remaining 30 g (2 tablespoons) olive oil over the surface of the dough and use your fingers to rub all over the surface, then sprinkle the chopped rosemary evenly over the dough.
- Next, use our fingers to press straight down into the dough, going almost to the bottom of the pan, to create deep dimples all over the dough. If the dough isn’t quite reaching the corners of the pan, gently pull the dough while you create the dimples to encourage it to fill the pan. If bubbles pop up on the surface, that’s okay- just leave them! Sprinkle flakey salt over the surface.
- Bake for 25 to 30 minutes, until golden brown and pulling away from the sides of the pan. Allow to cool in the pan for 5 minutes, then carefully transfer the focaccia from the pan to a wire rack to prevent the bottom from getting soggy (TIP: I like to use a large metal spatula for this). Allow to cool for 10 minutes before slicing and serving.
Notes
*For lukewarm water: combine 360 gm (1 ½ cups) cold water with 120 gm (1/2 cup) boiling water
Storage: Store leftovers in an airtight container at room temperature. Leftovers are great for toasted paninis, breakfast sandwiches, and toasted sandwiches!
Recipe adapted from Alexandra Stafford’s “Overnight Refrigerator Focaccia”


